Wednesday, 15 November 2017

Introducing the Stamparatus

Hi all!

Sorry it's been a while since my last post.  There's been a lot going on but I'm back today to introduce an amazing new stamp placement tool from Stampin' Up!.

It's called the Stamparatus and it looks amazing!  I can't wait to get my hands on one.


The Stamparatus is completely different to any other stamp positioning tool out there and will change the way you stamp.  It will allow you to:

  •  mass produce easily, 
  • consistently stamp crisp, clean images,
  • easily create 2-step, 3-step, and 4-step stamped images using reversible plate
  • make fewer mistakes, saving time and money.

Would you like more details?
  • Compatible with Stampin’ Up!’s red rubber and photopolymer stamps,
  • Foam mat to use with photopolymer stamps
  • Rulers and gridlines for quick measuring
  • 2 open sides so you can stamp on larger paper
  • 2 reversible plates: a total of 4 surfaces to work with
  • 2 magnets to hold the paper in place
  • Magnet storage areas
  • All this for only $85!


You will be able to reserve a Stamparatus from 17 November, ready for shipping around 1 February 2018, but you will need to get in quick as they only have a limited number available. Please note that you will not be charged until the Stamparatus is shipped.

If you miss out, don't worry as there will be 2 more opportunities to reserve a Stamparatus before it is released in next years Annual Catalogue.

To reserve your Stamparatus on 17 November CLICK HERE

You will need a credit card, and if you do not have an online account you will need to create one.  If you would like to select me as your Demonstrator, my details are:
  • Sarah Newick
  • Karabar, NSW, 2620

For more information on how to reserve a Stamparatus, please refer to the graphic and FAQs below.


Customer Stamparatus Launch Q & A

Q: How do I reserve my Stamparatus?
A: Normally you order Stampin’ Up! products through the online store; in this case, you will click the RESERVE link on the Stamparatus page which will take you to the reservation page. For step-by-step instructions, please see the How to Reserve Your Stamparatus Tutorial for Customers.

Q: What if I do not have a Stampin’ Up! customer account?  
A: To reserve a Stamparatus, you must have a customer account. To create one, click Create Account on the online store.

Q: Why does it take so long for the Stamparatus to ship?
A: We will place an order with the manufacturer based on how many reservations are made during any given reservation window. Shipping dates depend on how long it takes the order to arrive in our warehouse after the tools have been manufactured.

Q: Will the available-to-ship dates be the same for all markets?  
A: Yes.

Q: Am I billed at the time I reserve my Stamparatus?
A: No. However, a credit card is required to reserve the product. 

Q: When will I be charged for the Stamparatus? 
A: When inventory arrives in the warehouse, we will add your reservation to a shopping cart. We will then send you an email notifying you that your Stamparatus order is ready. Once you finalise payment and close your order, the system will charge your credit card.

Q: Will I be able to add other products to my Stamparatus reservation?
A: No. However, once your reservation is transferred to your shopping cart, you will then be able to add other items to your order. Important note: Please do not delete the Stamparatus from your order. We will not be able to add it back and you will lose your reservation.  

Q: Will I be able to update my address and credit card information when I open my shopping bag to complete my order?  
A: Yes. 

Q: What if I change my mind and want to cancel my reservation?  
A: You can cancel your reservation at any time. To cancel, please see the How to Reserve Your Stamparatus Tutorial for Customers PDF.

Q: Will the tool be available in the 2018–2019 annual catalogue? 
A: Yes. Once the annual catalogue ordering period begins, you will be able to order the Stamparatus as you would any other product. Reservations will no longer be required, and there will be no limit on the number of tools you can order. 

Q: Once the Stamparatus has been added to my shopping cart, how long will it stay there? 
A: Indefinitely. As with all products, it will be subject to temporary interruptions in availability depending on demand.

Q: When I close my order, can I take advantage of current Stampin’ Up! promotions?
A: Yes.

Q: Can I participate in all three reservation periods?  
A: Yes. 

Q: How many stamp placement tools can I reserve per reservation window?
A:  For customers, there is a limit of 1 per reservation window. 

Q: How did we come up with the name Stamparatus?  
A: We landed on an innovative name by combining two words that speak to the end use of the tool as well as Stampin’ Up! branding. 

Stamp: To impress a pattern or mark (especially an official one) on   a surface, object, or document using an engraved or inked  block or die or other instrument

Apparatus: The technical equipment or machinery needed for a  particular activity or purpose

Stamp + Apparatus = Stamparatus


If you have any questions, or would like some more information please feel free to contact me via my Facebook page, www.facebook.com/essjaycards.

Thanks!

Sarah


Sunday, 22 October 2017

Crazy Crafters Blog Hop with Jenny Hall


Hi and welcome to the Crazy Crafters Blog Hop with Special Guest Jenny Hall

I absolutely love Jenny's creations so it's very exciting to be taking part in a blog hop with her and CASEing (Copy and Selectively Edit) one of her cards.

The card I chose to CASE today is this amazing Christmas card.  I love the embossed background and how it adds something special to an already fantastic card.


For my card I decided to use many of the same elements, an embossed background, colour palate and the Christmas theme.

For my background I used the diamond/square pattern mask from the Pattern Party Decorative Masks and applied the Embossing Paste directly to a Basic Black card front.

While the embossed panel dried, I stamped one of the large greetings from the Carols of Christmas stamp set onto a piece of Whisper White cardstock using Basic Black ink.  I also added some holly images by colouring the stamp with Cherry Cobbler and Garden Green markers.  I then placed this panel onto the embossed card front using Stampin' Dimensionals before adhering the completed panel onto a Basic Black card base.


This was a really quick and easy card to make and I'll definitely be using the embossing paste more in my projects.

Don't forget to take a look through the rest of the blog hop.  The full lineup is listed below.

Thanks for stopping by.   I would love to hear from you so please feel free to leave a comment!

Sarah

Saturday, 21 October 2017

October craft kit now available

October Craft Kit Available!


October's craft kit is now available, and just in time for Christmas as it features the Stampin' Up!® Be Merry suite! 


A4 or 12"x12" size craft kits are available and are $35, including tracked postage. 

Multiple kits are available with first orders to be posted by Thursday 26 October. Additional kits will be ordered as needed.

All kits include: 
6 Boxwood Wreaths Embellishments
Metallic Enamel Shapes (40 pieces in total in gold and silver foil)
1.5 metres of Cherry Cobbler 1/4" Double Stitched Riboon
1.5 metres of Whisper White 1/8" Sheer Ribbon
2 metres of Gold Metallic Thread
3 embossed card stock panels (1 each in Whisper White, Cherry Cobbler and Garden Green)
Some inspiration (i.e. ideas on how to use the kit)

A4 size craft kit also includes:
12 sheets of 6"x12" double sided designer series paper
9 sheets of A4 cardstock (3 each of Whisper White, Cherry Cobbler and Garden Green)
8x Whisper White envelopes

12"x12" size craft kit includes:
6 sheets of 12"x12" double sided designer series paper
8 sheets of 12"x12"cardstock (2 each of Cherry Cobbler and Garden Green and 4 of Whisper White)
Note: envelopes are not included in the 12"x12" pack but can be added for 30c each if requested.
If you are interested in purchasing this craft kit, or a previous one, please complete this form or contact me via my Facebook page.

There is no minimum sign up required and no obligation to purchase a kit every month.  Just opt in for the kit you are interested in.

Thanks for stopping by!

Sarah

Sunday, 8 October 2017

Crazy Crafters Blog Hop


Hi!

I'm joining the Crazy Crafters for another blog hop this week today I thought I'd show you another Christmas card!

For this card, I started off by creating a watercolour background using Dapper Denim and Pool Party ink.  Next, I stamped a sentiment from the Snowflake Sentiments stamp set using Basic Black ink and cut it out using one of the circle dies from the Stitched Shapes Framelits Dies.  

I then die cut some small snowflakes out of Whisper White cardstock using the Swirly Snowflakes Thinlits Dies and placed them around the card.


To complete the card, I created a little banner by using 2 strips of Dapper Denim cardstock and the Classic Label Punch - I cut out the top layer of the banner by using the punch as it was designed, and the bottom layer I made a little longer and only cut the ends by slipping them into the punch from the side to create the banner.

I also added some sparkle to the card by using Clear Wink of Stella on the snowflakes and some Glitter Enamel Dots.


I'm really happy with how this card turned out and I hope you've enjoyed reading about the process I went through to create it!

As always, I'd love to hear from you so please feel free to leave a comment.  Also, don't forget to take a look at the rest of the blog hop as there's plenty of amazing projects to see!

Thanks for stopping by.  

Sarah


Sunday, 24 September 2017

Crazy Crafters Blog Hop with Sarah Fleming


Hi!

Welcome to the Crazy Crafters Blog Hop with Special Guest Sarah Fleming

Sarah is a Stampin' Up! Demonstrator from Texas, USA, is amazingly talented.   She has made so many lovely card creations that it was really tough to decide which card to CASE (Copy and Selectively Edit).  I did manage to narrow it down to this card, but I'm positive I'll be CASE-ing a few more over the next few weeks!


I was so inspired this week that I made 2 cards, both using the Quilted Christmas Designer Series Paper and Stitched Felt Embellishments.

For my first card I decided to go with a 'Christmas Tree' theme and used some Christmas Tree paper and felt embellishment as well as a stamp set from the Labels to Love stamp set.  To stamp the sentiment I masked off the "Merry Christmas", inked the stamp up using Garden Green ink, then removed the mask and coloured the "Merry Christmas" in using a Real Red marker.  I then punched the sentiment out using the Everyday Label punch.


For my second card I used another piece of patterned paper from the Quilted Christmas Designer Series Paper, a holly felt embellishment and the Merry Little Labels stamp set.  I used the same technique to stamp the sentiment and also added some strips of Garden Green cardstock on either side of the patterned paper.  I also used the Stitched Shapes Framelits Dies to die cut the sentiment (I can't get enough of these dies)!


I'm really happy with how these cards turned out, and how simple the were to put together using just some patterned paper and the felt embellishments.

Thanks for stopping by.  I really appreciate your support and would love to hear from you so please feel free to leave a comment!

There's an amazing lineup today so make sure you check out the rest of the blog hop.

Sarah


Sunday, 10 September 2017

Crazy Crafters Blog Hop with Stesha Bloodhart


Hi!

After a short break, I'm back again for another Crazy Crafters Blog Hop.  

You're in for a special treat today as we're joined by, and CASE-ing (Copy and Selectively Edit), the amazing Stesha Bloodhart.  I love Stesha's work so it's very exciting to be participating in a blog hop with her! 

As always, we're spoilt for choice when deciding on a project to CASE.  As I was scrolling through Stesha's page, I came across this project.  I love the blue background and how the embossing pops so those are the elements I used for my card.


I started with a piece of Tempting Turquoise cardstock and heat embossed the snowflake images and a sentiment from the Snowflake Sentiments stamp set using White Stampin' Emboss powder.  


I then sponged Night of Navy, Pacific Point and Tempting Turquoise ink over the bottom half of the panel, starting with the darkest colour and gradually blending the colours out to create a slight ombré effect.

To finish the card off I used some Whisper White Sheer Ribbon and added rhinestones to the larger snowflakes. 

This was a really quick and easy card to make and I love how it turned out.  I'll definitely be making more to add to my Christmas cards for this year!

Thanks for stopping by.  I'd love to hear from you so please feel free to leave a comment.  And don't forget to take a look at the rest of the blog hop.  There's so many amazing projects to see!

Sarah

Friday, 1 September 2017

Holiday Catalogue Giveaway!

To celebrate the release of the Holiday Catalogue, I'm giving away a $50 voucher to spend in my Stampin' Up!® store.

To enter the draw simply place an order during September via my online store.

You will receive 1 entry for every $50 (excluding postage) you spend in my store during September. 

The winner will be drawn on Sunday 1 October and announced on my Facebook page, www.facebook.com/essjaycards.

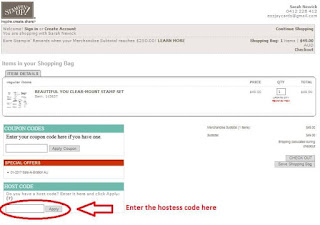
For orders under $250 (before postage), use hostess code 9ZN9FBFE when placing your order and you will also receive a free gift from me at the end of the month. If your order is $250 or more (before postage) please do not use the hostess code as you will be eligible to select your own rewards :)

To shop at my online store, click here or on the 'Shop Online' button.

Need help entering the hostess code?  Here's a quick guide :)


Thursday, 31 August 2017

Day 12 of my 12 Days of Christmas - Holiday Catalogue sneak peak

Well, today is the final day of my 12 Days of Christmas - Holiday Catalogue sneak peak so what better way to finish it off than with the Year of Cheer Suite.

I hope you've enjoyed the previews! There's so much more in the Catalogue so don't forget to head online tomorrow to take a look at the full product range by clicking the 'Shop Now' button.

Make sure you stop by tomorrow too as I'll be announcing a special offer to celebrate the release of the 2017 Holiday Catalogue.


Sarah

Wednesday, 30 August 2017

Day 11 of my 12 Days of Christmas - Holiday Catalogue sneak peak

I can't believe it's Day 11 of my 12 Days of Christmas - Holiday Catalogue sneak peak!

Today we're checking out the Ready for Christmas Bundle. I love the dies in this Bundle as they cut out most of the stamp images which means very little fussing cutting!


Sarah

Tuesday, 29 August 2017

Day 10 of my 12 Days of Christmas - Holiday Catalogue sneak peak

Day 10 of my 12 Days of Christmas - Holiday Catalogue sneak peak is here and we're showcasing the Be Merry Kit.

This kit makes 12 rosettes which you can use as ornaments to decorate your Christmas tree or home, or you can use them as gift tags.


Sarah

Monday, 28 August 2017

Day 9 of my 12 Days of Christmas - Holiday Catalogue sneak peak

We've arrived at Day 9 of my 12 Days of Christmas - Holiday Catalogue sneak peak.

Today we're taking a look at the Smitten Mittens Bundle. This set makes cute gift tags and can be used to jazz up any card.


Sarah

Sunday, 27 August 2017

Crazy Crafters Blog Hop with Debbie Henderson


Hi there!

Today I'm taking part in the Crazy Crafters Blog Hop with special guest, Debbie Henderson!

I love Debbie's creations and there were so many amazing ideas to CASE (Copy and Selectively Edit) but today I chose to CASE this card.


I love the layout of the card and how Debbie used embossing paste to create the background.

For my card I decided to keep the layout similar but rather than use embossing paste, I used the Softly Falling Embossing Folder.


I used a combination of Real Red and Whisper White cardstock for my layers and the Layering Circles and Stitched Shapes Framelits Dies to create the scallop and circle.

The little house and trees are from a new stamp set in the Holiday Catalogue called Hearts Come Home, and I stamped the images in  Real Red, Smoky Slate and Wild Wasabi.  The sentiment is from the Teeny Tiny Sentiments stamp set.

This was a quick and easy card to make but I love how using something as simple as an embossing folder can step things up a bit.

I hope you've enjoyed todays card.  Don't forget to leave a comment before moving on to check out the rest of the blog hop!  The full lineup is listed below.

Thanks for stopping by!

Sarah

Day 8 of my 12 Days of Christmas - Holiday Catalogue sneak peak

It's Day 8 of my 12 Days of Christmas - Holiday Catalogue sneak peak and today we're taking a look at the Merry Little Christmas Memories & More Card Pack.

The Memories & More Card Packs can be used for card making and scrapbooking and are inexpensive. Plus, there's a whole range of Memories & More Card Packs available. You can check them all out on my online store by clicking the 'Shop Now' button.


Sarah

Saturday, 26 August 2017

Day 7 of my 12 Days of Christmas - Holiday Catalogue sneak peak

Day 7 of my 12 Days of Christmas - Holiday Catalogue sneak peak has arrived and today we're featuring the Quilted Christmas Suite.

What I love most about this Suite, particularly the stamp set and dies, is that it's not limited to Christmas so you'll be able to use it all year round.


Sarah

Friday, 25 August 2017

Day 6 of my 12 Days of Christmas - Holiday Catalogue sneak peak

Today is Day 6 of my 12 Days of Christmas - Holiday Catalogue sneak peak which means we're already half way through!

What better way to celebrate than to preview one of my favourites. The Watercolor Christmas Project Kit. These kits are great as they make 20 cards and come with almost everything you need! Making Christmas cards this year couldn't be any easier.


Sarah

Thursday, 24 August 2017

Day 5 of my 12 Days of Christmas - Holiday Catalogue sneak peak

Day 5 of my 12 Days of Christmas - Holiday Catalogue sneak peak has arrived and it's time to take a look at the Merry Little Christmas Suite.

I don't know about you, but I love that this suite includes a punch. It's going to be so quick and easy to put together gift tags this year!


Sarah

Wednesday, 23 August 2017

Day 4 of my 12 Days of Christmas - Holiday Catalogue sneak peak

It's Day 4 of my 12 Days of Christmas - Holiday Catalogue sneak peak.

Today we're previewing the Snowflake Sentiments Bundle, which I can't wait to create with!


Sarah

Tuesday, 22 August 2017

Day 3 of my 12 Days of Christmas - Holiday Catalogue sneak peak

Today is Day 3 of my 12 Days of Christmas - Holiday Catalogue sneak peak and we're taking a look at the Designer Series Paper.

There are 7 different packs of Designer Series Paper that will be available to purchase as well as Champagne Foil Sheets!


Sarah

Monday, 21 August 2017

Day 2 of my 12 Days of Christmas - Holiday Catalogue sneak peak

Welcome back!

Today is Day 2 of the 12 Days of Christmas - Holiday Catalogue sneak peak and we're featuring the Hearts Come Home Bundle.

This Bundle has so many possibilities and I'm especially looking forward to creating some home decor items with it.

This Bundle will be available for purchase in my online store from 1 September 2017 so make sure you don't miss you!


Sarah

Sunday, 20 August 2017

Day 1 of my 12 Days of Christmas - Holiday Catalogue sneak peak

Hi everyone!

Some of you may already know this, but just in case you don't, the new Stampin' Up! Holiday catalogue will be released on 1 September!

There are some amazing products in there and I thought I might give you all some sneak peaks of what's to come so I'm running the '12 days of Christmas - Holiday
Catalogue sneak peak'.

Each day I will post a video showcasing some products that will be
available to purchase from 1 September.

Today is Day 1, so lets's kick it off with the Carols of Christmas Bundle.


This is a fantastic set with so many possibilities.

Did you know too, that you can actually purchase this Bundle, or just the stamp or die set, now!!  If you'd like to get your hands on it, head on over to store by clicking the 'Shop Now' button.

Don't forget to use this months hostess code (XYM3VU9B) when you place an order as you'll receive a free gift from me at the end of the month!

That's it for me for today.  Don't forget to stop by tomorrow for Day 2 of my 12 Days of Christmas - Holiday Catalogue sneak peak.

Sarah


Sunday, 13 August 2017

Crazy Crafters Blog Hop with Martha Inchely

Hi again!

It’s time for another Crazy Crafters Blog Hop and today we’re joined by special guest Martha Inchely.

Martha is part of the Stampin’ Up! Artisan Design Team, and if you stop over and check out her blog, you’ll see why.  She is one talented lady!!

It took me a while to decide which of Martha’s projects to CASE (Copy and Selectively Edit).  She has some amazing fancy fold cards that I’m definitely going to give a try, but I’m a sucker for mini cards and when I saw these 3”x3” cards, I just had to CASE them
😊


For my 3"x"3 cards I decided to use the Naturally Eclectic suite.  I love the bright colours and patterns in the Naturally Eclectic Designer Series Paper and think they look amazing when paired with the Eclectic Layers Thinlits Dies.
To create each of my cards, I started off with a Whisper White card base and a piece of the

Naturally Eclectic Designer Series Paper which I cut slightly smaller than the card base.  I then die cut a number of images from the Eclectic Layers Thinlits Dies.


For my first card I die cut the flower using Whisper White cardstock and watercoloured it using Berry Burst and Lemon Lime Twist ink.  I then die cut another piece of Whisper White cardstock using the Lots of Labels Framelits Dies and attached it to the flower.  The sentiment is from the Tabs for Everything stamp set and is stamped in Basic Black ink.

 
For my next card I die cut the diamond using Soft Sky cardstock and attached it to a piece of Whisper White cardstock I punched out using the new Everyday Label Punch.  The sentiment is from the Teeny Tiny Sentiments stamp set and I also used Clear Wink of Stella on the diamond to add a bit of sparkle.


For my last card I die cut the large flower using Berry Burst cardstock and the leaves which i had stamped in Emerald Envy.  I attached these to a Whisper White circle I die cut using the Layering Circles Framelits Dies.  The sentiment I used on this card is also from the Teeny Tiny Sentiment stamp set.


That's it from me for today. Please feel free to leave a comment.  I love hearing from you all!

Don't forget to take a look at the rest of the blog hop as there's plenty of fantastic creations and inspiration.

Thanks for stopping by!

Sarah